Opening your first sewing pattern can feel like reading a map in another language: arrows, triangles, dots, nested lines and a size chart that doesn’t match the size on your jeans. The good news is that every sewing pattern uses the same basic language, and once you know it, you can sew almost anything.
In this beginner guide you’ll learn how to read a sewing pattern step by step: how to choose your size, what the fabric chart tells you, what every pattern symbol means, and how PDF patterns work. We’ll use real examples from our free patterns, so you can practise right away.
What’s inside a sewing pattern?
Whether it comes in a paper envelope or as a PDF download, a sewing pattern is made of the same parts:
- Pattern pieces: the paper shapes you cut out and pin to your fabric, one for each part of the garment (front, back, sleeve, facing…).
- Size chart: the body measurements each size is drafted for, sometimes with finished garment measurements too.
- Fabric requirements: how much fabric you need for each size and fabric width, plus suggested fabrics.
- Notions: everything else you need, like interfacing, buttons, zips, elastic or bias binding.
- Pattern piece list and cutting guide: how many of each piece to cut and from which material.
- Sewing instructions: the order of construction, usually with illustrations.
Read everything once from start to finish before you cut anything. Five minutes of reading saves hours of unpicking.
Step 1: How to choose your sewing pattern size
This is where most beginners go wrong. Pattern sizes are not shop sizes. A size 12 in a sewing pattern can be very different from a size 12 in a store, so never pick your size from the label in your clothes.
Instead, take your body measurements and compare them with the pattern’s size chart. Here is a real example from the size chart of our Deep V Tailored Vest:
| Size | Bust (cm) | Waist (cm) | Hips (cm) |
|---|---|---|---|
| 6 | 90.25 | 73.75 | 98 |
| 8 | 92.75 | 76.25 | 100.25 |
| 10 | 95.25 | 78.75 | 102.75 |
| 12 | 99.25 | 82.75 | 106.5 |
- Tops, jackets and vests: choose by your bust, then check the waist and hips.
- Skirts and trousers: choose by your waist and hips.
- Between two sizes? For a fitted style, go with the larger measurement and take it in; for a loose style, the smaller size often works.
Not sure how to measure? Follow our step-by-step guide on how to take your body measurements, then read how to choose your sewing pattern size.
Step 2: Read the fabric requirements and notions
The fabric chart tells you how much fabric to buy. Find your size in one direction and your fabric width in the other. Fabric is usually sold in two common widths, 115 cm (45″) and 150 cm (60″); narrower fabric means you need more length.
| Sizes | 150 cm / 60″ wide | 115 cm / 45″ wide |
|---|---|---|
| 00–6 | 1.20 m | 1.70 m |
| 8–12 | 1.40 m | 1.90 m |
| 14–18 | 1.60 m | 2.20 m |
| 20–22 | 1.80 m | 2.40 m |
Example: fabric chart for the Deep V Tailored Vest.
Look at the suggested fabrics too. They are not a random list: they tell you the weight and drape the garment was designed for. A tailored vest needs a woven with some structure, like suiting or twill; the same pattern in a floppy jersey would lose its shape.
Step 3: Sewing pattern symbols explained
Pattern pieces are covered with markings. Each one has a job, and together they make sure your pieces are cut on the right grain and joined in the right place.
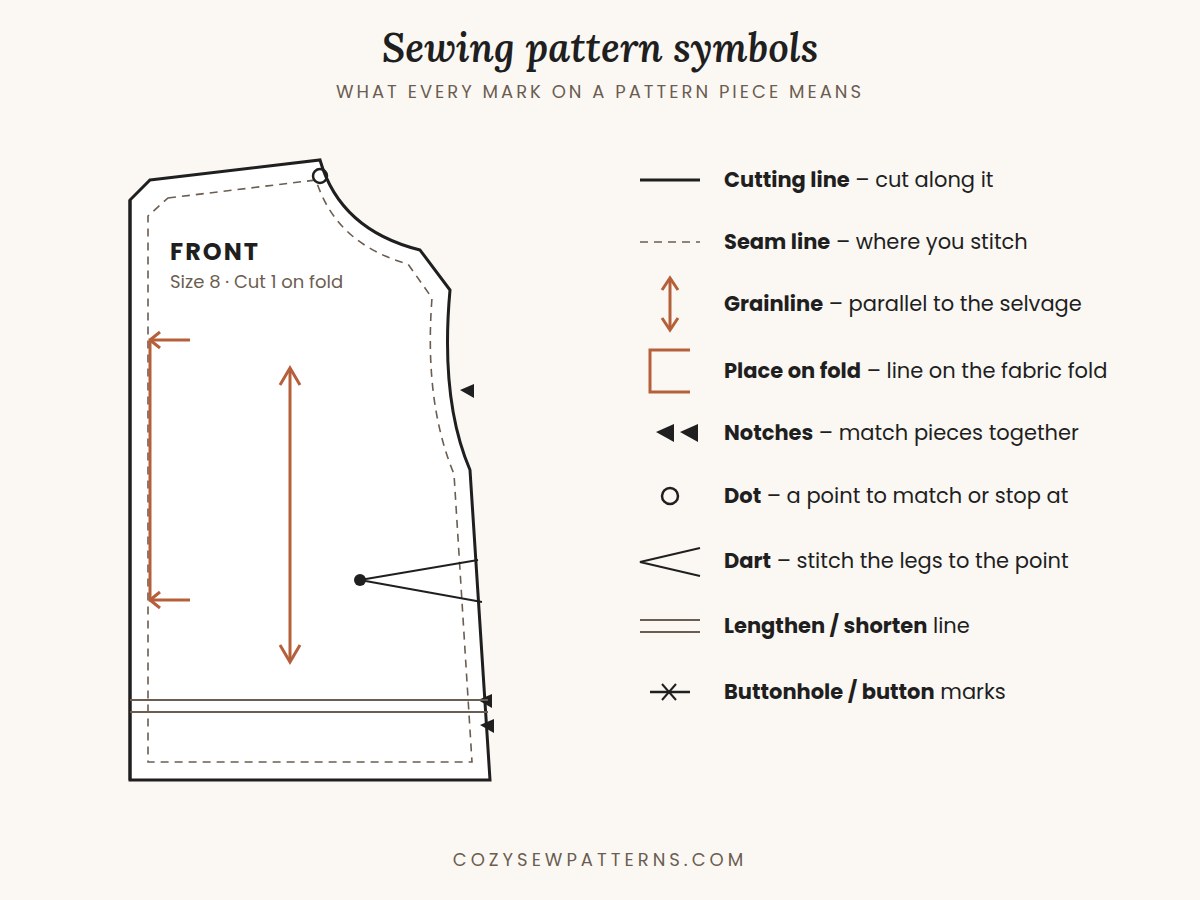
| Symbol | What it means | What to do |
|---|---|---|
| Cutting line (solid line) | The outer edge of the piece | Cut along it, for your size only |
| Seam line (dashed line) | Where the stitching goes | Sew along it; not every pattern prints it |
| Grainline (straight double arrow) | How the piece sits on the fabric | Keep the arrow parallel to the selvage |
| Place on fold (bracket with arrows) | This edge is the centre of a symmetrical piece | Place it exactly on the fabric fold, don’t cut it |
| Notches (triangles or small lines) | Matching points between pieces | Mark or snip them, then match them when sewing |
| Dots / circles | Matching points or stitching stops | Transfer them with chalk or a pin |
| Dart (V-shaped lines) | Shaping for bust, waist or back | Fold, match the lines and stitch to the point |
| Lengthen / shorten line (double line) | Best place to change the length | Cut and spread, or fold out, along it |
| Buttonhole / button marks | Position of each closure | Transfer them to the right front and left front |
Step 4: Multi-size cutting lines
Most modern patterns are multi-size: all sizes are nested on the same piece, each with its own line style or colour. Before cutting, trace or highlight your size with a coloured pen so you don’t drift onto the next line around curves.
Many PDF patterns, including ours, go one step further and give you one file per size, so you only print and see your own lines. No highlighting needed.
Step 5: Seam allowance and hem allowance
The seam allowance is the distance between the cutting line and the stitching line. Always check it in the pattern notes, because it changes from one designer to another: 1 cm (3/8″), 1.5 cm (5/8″) and 6 mm (1/4″) are all common, and some patterns don’t include it at all.
- Included: cut on the line and stitch the stated distance from the edge.
- Not included: you must add it all around when cutting.
- Hem allowance: the extra length at the bottom edge that is folded up to finish the hem, often wider than the seam allowance.
All CozySewPatterns patterns include a 1 cm (3/8″) seam allowance, and the hem allowance is listed on each pattern’s page.
Step 6: Cutting instructions: “cut 2”, “cut 1 on fold”
Each pattern piece is labelled with its name and how many to cut. Here is the pattern piece list from our Deep V Tailored Vest:
| Pattern piece | Material | Cut |
|---|---|---|
| Front | Main fabric | 2 |
| Back | Main fabric | 2 |
| Front neck facing | Main fabric + fusible interfacing | 2 + 2 |
| Back neck facing | Main fabric + fusible interfacing | 2 + 2 |
- Cut 2: fold your fabric right sides together and cut once; you get a left and a right piece.
- Cut 1 on fold: place the fold edge on the fabric fold; the piece opens up symmetrical.
- Cut 2 + 2: two pieces in fabric and two in interfacing.
- Right side / wrong side: the right side is the “pretty” side that shows on the outside of the garment.
Step 7: How PDF sewing patterns work
A PDF pattern is the same as a paper pattern, just delivered as a file. Here is what makes it different:
- Paper formats: A4 and US Letter files print at home on several pages you tape together; A0 files are printed in one large sheet at a copy shop.
- Calibration square: print it first at 100% or “actual size” and measure it (10 cm / 4″). If it is wrong, check your printer settings before printing the rest.
- Page grid: each page has a code like 1/1, 2/1, 3/1. Pages with the same second number form one row. Overlap the edges, match the marks and tape.
- ZIP files: unzip the folder first, then open the PDF for your size.
Our full tutorial shows every step with pictures: how to print and assemble a PDF sewing pattern.
Common sewing pattern terms
| Term | Meaning |
|---|---|
| Selvage | The finished edges of the fabric that don’t fray |
| Bias | 45° to the grainline; fabric stretches most in this direction |
| Right sides together (RST) | Place the two “pretty” sides facing each other before sewing |
| Staystitch | A line of stitching inside the seam allowance to stop curves stretching |
| Understitch | Stitching the facing to the seam allowance so it rolls inside |
| Interfacing | A layer fused or sewn to fabric to add structure |
| Ease | Extra room between your body and the garment |
Practise with a free pattern
The best way to learn how to read a sewing pattern is to use one. Download one of our free PDF patterns: every one comes with a size chart, fabric chart and pattern piece list, in A4, US Letter and A0.
Want every step drawn out for you? Each pattern has an optional illustrated step-by-step guide.
Frequently asked questions
What do the symbols on a sewing pattern mean?
They tell you how to cut and join each piece. The grainline arrow shows how the piece sits on the fabric, the fold bracket marks an edge placed on the fabric fold, notches and dots are matching points, and dart lines show where to stitch shaping.
Should I choose my pattern size by my clothing size?
No. Pattern sizes follow a body measurement chart and are often different from shop sizes. Measure your bust, waist and hips and compare them with the pattern’s size chart.
Is seam allowance included in PDF sewing patterns?
It depends on the designer, so always check the pattern notes. All CozySewPatterns patterns include a 1 cm (3/8″) seam allowance.
What does ‘cut 2’ or ‘cut 1 on fold’ mean?
‘Cut 2’ means you need two of that piece, usually a mirrored pair cut from folded fabric. ‘Cut 1 on fold’ means you place the fold line of the piece on the fold of the fabric and cut one piece that opens up symmetrical.
Happy sewing!